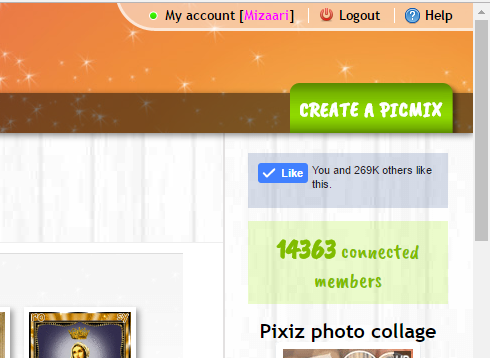


Look for the "LOGIN" option in the upper-right corner
make sure you create your own account otherwise it will not save your work.
TO START CREATING:
select "create a picmix" green button
LOGIN
CREATE
START HERE
TRY TO CHOOSE A BACKGROUND THAT IS LARGE & SQUARE TO MAXIMIZE YOUR SPACE
Start by choosing your background.
I have found it is best to use a square-shaped image file because it gives you the most space. Whatever background you choose, the size of it will determine the size of your whole design. You CAN paint over it, so sometimes I select a background but you will not see it in my finished piece.
Once you have chosen your background file from your computer, it will appear in your Picmix editor. You CAN paint over it using the paint brush tool and clicking any selection from the right as your paint. Try it! It is good to experiment to see your options. You can always start over. The erase tool only works on painted areas. It will not erase drop-drag elements.
Now you can search for your drop-drag elements. Either use the search bar, or choose "most popular" in the drop-down menu. Once you find what you want, left-click and drag it into the editor. You will see four options appear in, one in each corner. Move the image or re-size or duplicate as desired. Add more elements...


IT WILL LOOK LIKE THIS
ROTATE ELEMENT
DUPLICATE ELEMENT
RE-SIZE ELEMENT
CANCEL
CHOOSE ONE
and drag to center
can use search box


can use search box
can upload your own from computer files
TEXT WRITER
TEXT INK
TEXT INK
TEXT BOX
can be re-sized and moved
WRITE YOUR WORDS HERE
In addition to using their elements, or "stamps", as they call them, you can upload any of your own. Keep in mind you will want them to be on a transparent background so you can use the background you have already chosen. Look for png files in a google search such as "cat png" to find resources.
You can use the text creator in the editor by selecting an "ink" from the right-side and typing your message in the box above your pic. The font and outline color can also be changed. Click "ok" to add to the editor. Once in the editor the text can be moved and re-sized like any other stamp.
you can also use text images created in other places like cooltext.com
CHANGE LAYER ORDER
You can create interesting effects by using a large square of "ink" and layering it just on top of your background, but underneath all other layered stamps. Change the transparency to less than half so you can still see your original background. Keep clicking the layering button until you send it far enough back so all your stamps are showing.
Here is your final result. Make any necessary last minute changes and then press the "save" button at the bottom left. If you want to add your Lady as a stamp and do not know how to grab her from your gallery click here


CHANGE TRANSPARENCY
confirm "yes" or "oui"

it will take a few moments to create your file

make sure to name it and select publish unless you want to keep it private

choose "export to a website" if you want to use it in LP comments

a new box will open with three different sizes shown. I always use the largest. Left-click and drag your mouse to highligh the section after "See that Picmix" that begins with HTTP://
select and drag until the .gif
then right-click it and copy it

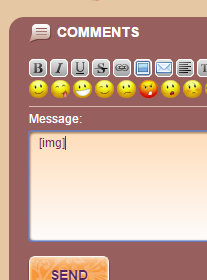
in your LP comment box, choose the icon that looks like a polaroid picture, which will add a "[img]" to your message box

right-click the message box and select "paste" to add your PICMIX image address


in your LP comment box, choose the icon that looks like a polaroid picture again, which will add a "[/img]" after your pasted image address

make sure you add a little message before the image link and use the 'return" button on your keyboard to create some line spaces.
Finally... click "SEND"

